Once Tonee Scribing has been set up for your organisation, you can record a consultation and have HearLink's AI assistant turn it into a structured report, a clinical note and a patient summary, so you can stay present with the patient instead of typing. This article covers recording an appointment, generating the report, and reviewing and using it on the patient's file.
Reports are AI-generated drafts and must be reviewed for accuracy before use.
In this article we'll cover how to:
Recording uses the configuration and consultation templates set up for your organisation. See Tonee Scribing Configuration and Tonee Scribing Templates for how these are configured.Record a consultation
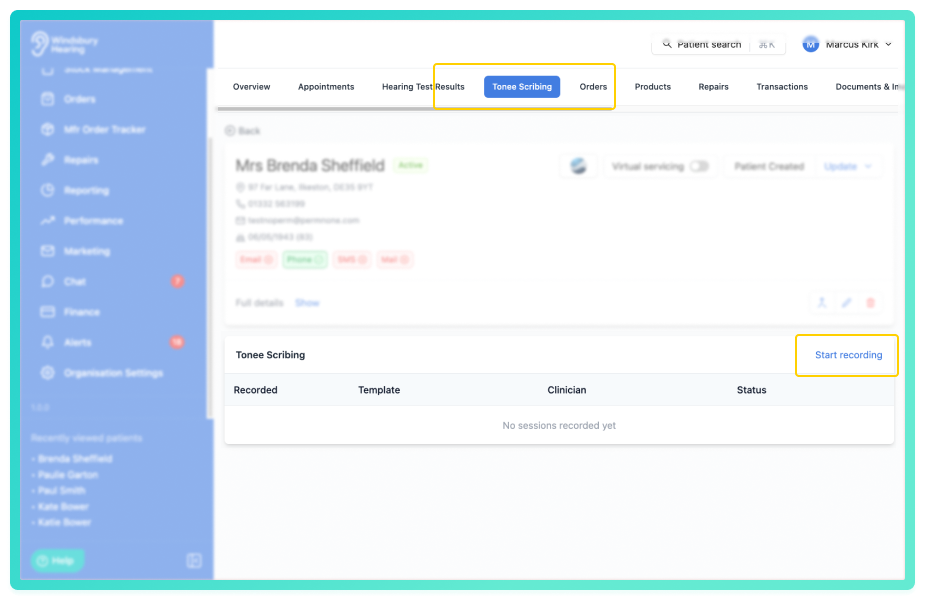
Recording is started from the patient's file, so the session is always tied to the right patient.
- Open the patient's Tonee Scribing tab.
- Click Start recording.
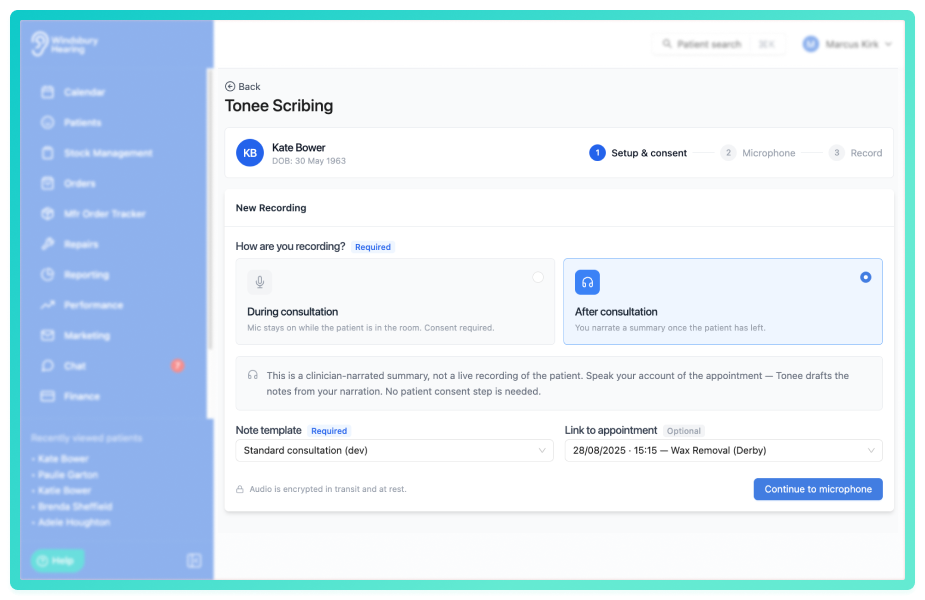
Choose how you are recording
The first step asks how you are recording. The choice changes whether a consent step is shown and how Tonee treats what it hears.
- During consultation: the microphone stays on while the patient is in the room and captures the live conversation. Consent is required. Use this for the appointment itself.
- After consultation: you narrate a summary once the patient has left. This is your spoken account of the appointment, not a live recording of the patient, so no consent step is needed. Tonee drafts the notes from your narration.
Capture consent (during consultation only)
- The consent script from your settings is shown on screen to read to the patient.
- Tick Patient has been informed and consents to recording to continue. This is logged against the patient's record with a timestamp.
Set up the session
- Choose a note template. This is required, it determines the structure of the report (see the templates section of the setup article). Only active templates appear here.
- Optionally link the session to a related appointment, so the recording is associated with that visit.
- Click Continue to microphone, then allow microphone access if your browser prompts you.
- Once ready click Start recording.
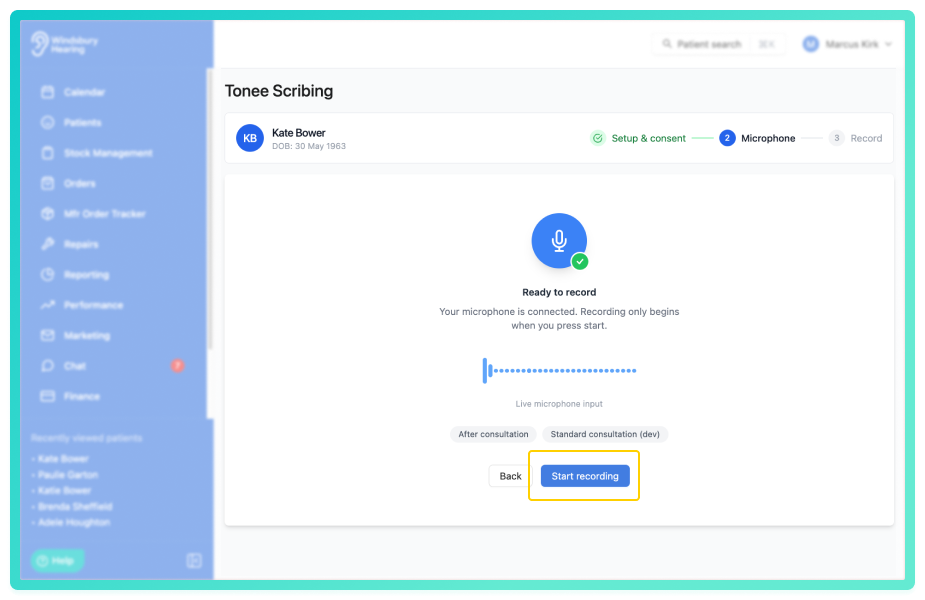
Audio is encrypted in transit and at rest. If the microphone can't be reached, check that your browser has permission to use it and that no other application is using it, then try again.While recording
- The recorder will automatically minimise to a small draggable mini-player. You can move it anywhere on screen and keep working elsewhere in HearLink during the appointment.
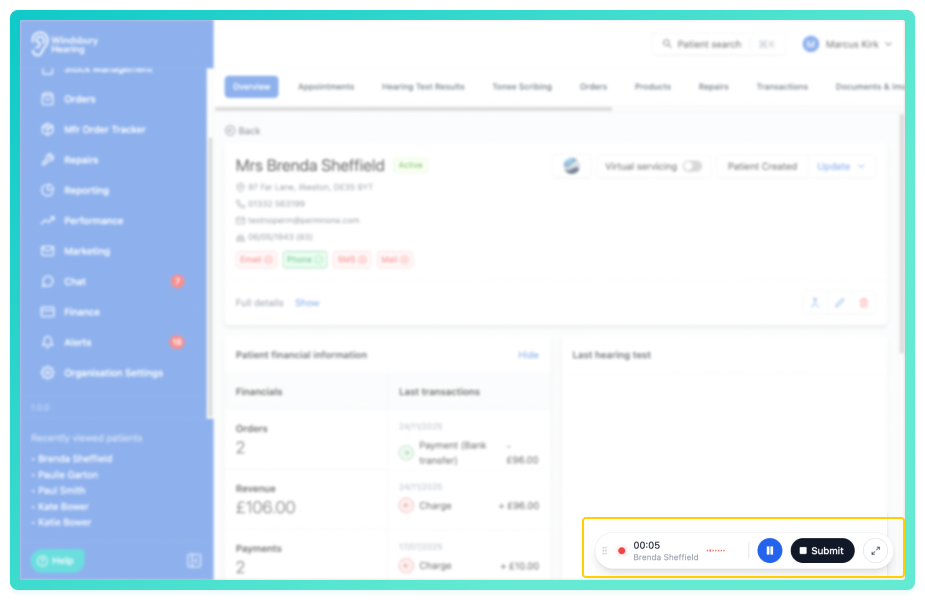
- Pause and Resume at any time, for example if the patient steps out or the conversation moves off-topic.
- Click Stop recording and then Submit when you're finished.
Reminder: recordings have a length limit. You'll see an Approaching limit warning at around 90 minutes — wrap up the session soon after this. Recording stops automatically at 2 hours to keep file sizes manageable.Generate the report
When you submit the recording, the Generate report dialog opens. Here you can give Tonee a little more to work with before it writes the report.
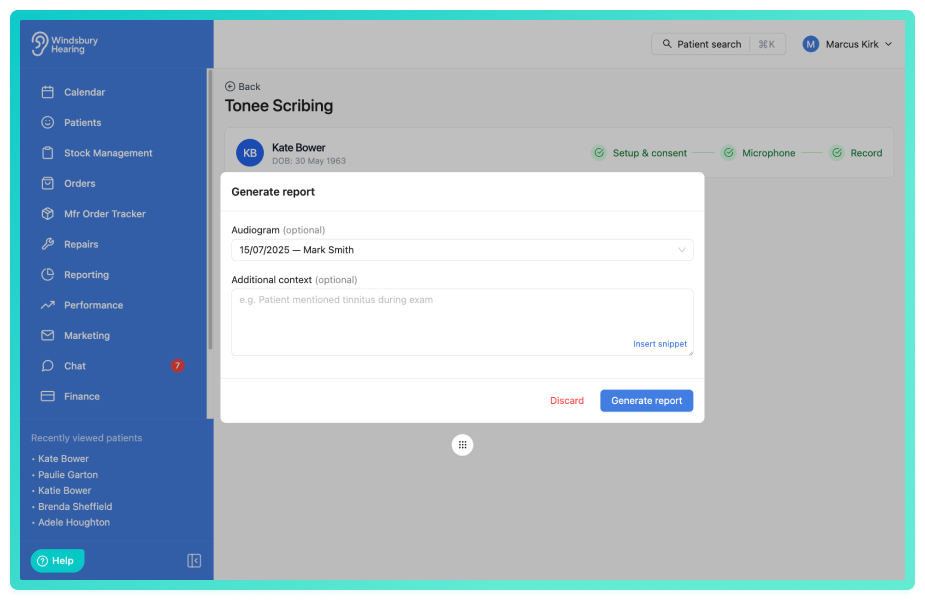
Audiogram (optional)
- Select one of the patient's hearing tests from the dropdown to give Tonee the results as context, so the report can describe and refer to them.
- Only the threshold measurements are shared, no patient identifiers. If the patient has no hearing tests yet, you'll see No hearing tests on file and a link to add one.
Tonee won't classify the type of loss (sensorineural, conductive or mixed) unless the audiogram includes bone-conduction thresholds. With air-conduction results only, it reports the results and notes that the type of loss can't be determined without bone-conduction testing.Additional context (optional)
- Add anything relevant that wasn't said aloud during the recording - for example, "Patient mentioned tinnitus during exam" or an observation you made but didn't voice. Tonee uses this alongside the transcript when writing the report.
- Click Generate report to start, or Discard to abandon the recording without generating anything.
Tonee then works through a few stages, shown as the session status:
- Transcribing — converting the recording to text.
- Processing — writing the report from the transcript.
- Completed — the report is ready to view.
You don't have to wait on this screen, you can leave and come back, and the status on the patient's session list will update. If a session shows as Failed, open it and use Retry report to try again.
Tonee only writes what is actually supported by the recording, the audiogram and the context you give it. If something wasn't discussed, it says so rather than inventing it — so a section may read "not documented". This is by design: the report is grounded in what really happened.View and use the report
Open a completed session by clicking the Eye icon to see the Consultation report. The header shows the patient, date of birth, when it was recorded, the clinician and the template used. Depending on your settings, the content is split across up to four tabs.
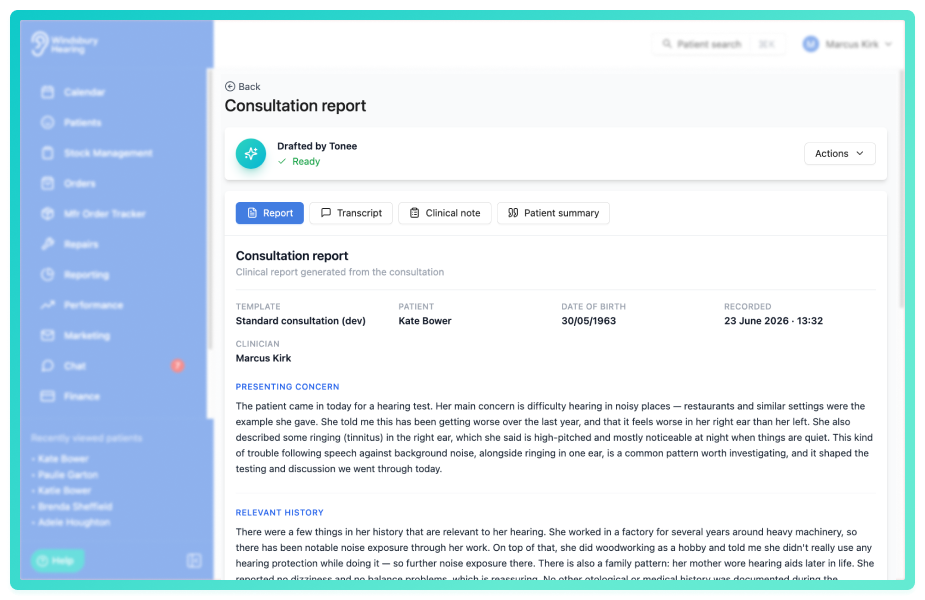
- Report: the structured clinical report, written in the sections, tone and depth from your template and settings. Always shown.
- Transcript: a word-for-word record of the consultation, split into speaker turns (clinician, patient or other). Always shown.
- Clinical note: a concise, staff-facing note to file in the patient record. Shown when the patient note output is enabled.
- Patient summary: a plain-language summary written for the patient to read, formatted to paste straight into an email. Shown when the patient summary output is enabled.
The Clinical note and Patient summary tabs have a Copy button so you can paste the content wherever you need it.
Edit the report
Tonee reports are drafts and can be edited directly in the viewer to correct inaccuracies or refine content. Click the Edit report button to enter edit mode. You can update section content, clinical notes and patient summary text. The referral flag and reason can also be toggled on and edited. Click Save to to save the changes, the PDF will automatically regenerate with the updated content. Click Cancel to discard the changes.
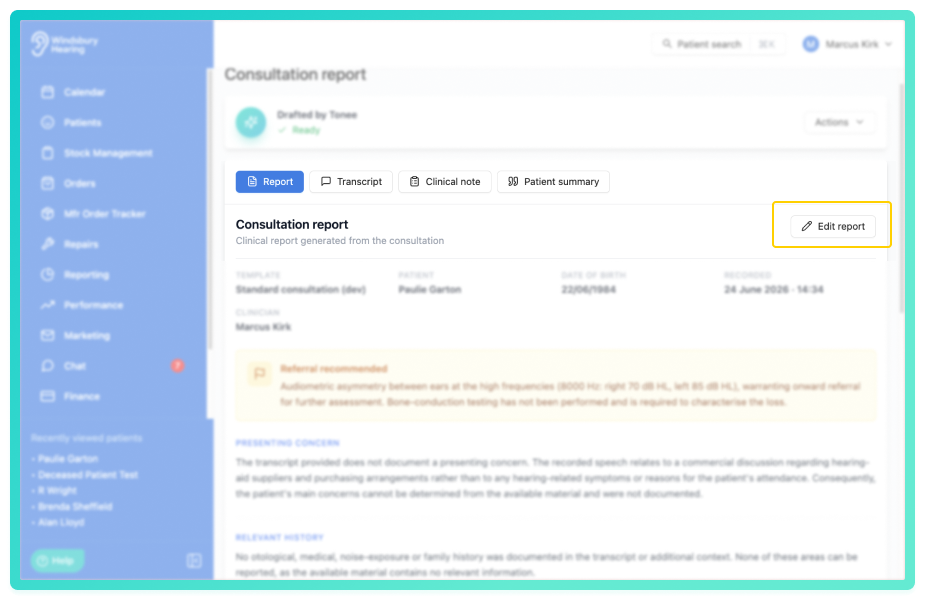
Referral recommended
If what was discussed and recorded suggests the patient may need to be referred on, a Referral recommended flag is shown on the report, with a brief reason. Tonee raises it for the kinds of findings that usually warrant onward referral, such as:
- Asymmetry between the ears: a notable difference in thresholds between the two ears.
- Sudden or rapidly progressive loss: hearing that has dropped quickly or appears to be worsening fast.
- Unilateral loss: loss affecting only one ear.
- Persistent unilateral tinnitus: ongoing tinnitus in one ear only.
- Conductive signs: an air–bone gap or other indication of a conductive component.
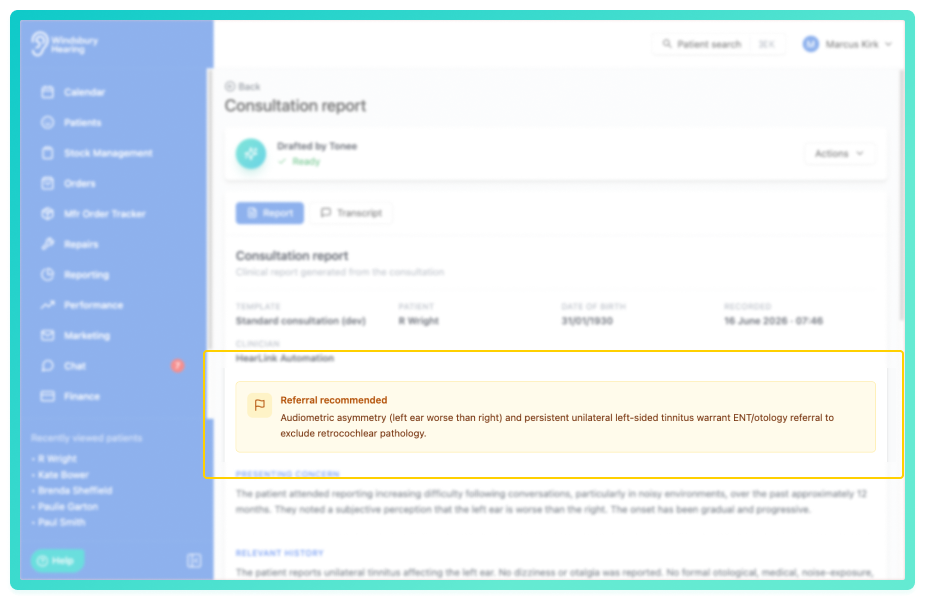
The flag is drawn only from what is present in the recording, the audiogram and any context you added. It's a prompt for your clinical judgement, not a decision, review it as you would any other finding and weigh it against the full clinical picture.
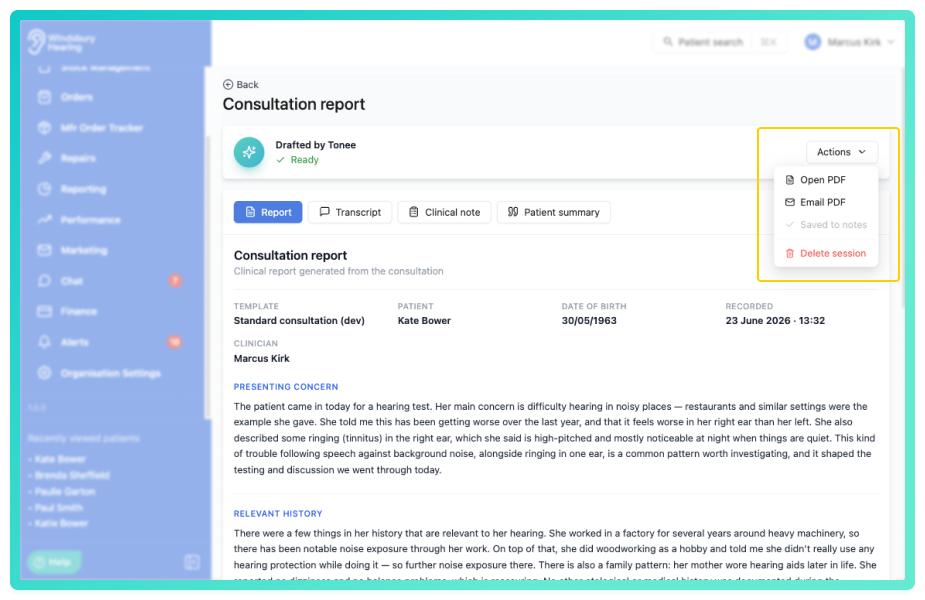
Actions
From the report's Actions menu you can:
- Open PDF: open the report as a PDF.
- Email PDF: email the report to the patient.
- Save note: add the clinical note to the patient's notes. (If auto-save is enabled in your settings, this happens automatically.)
- Retry report: regenerate the report, for example after a failure.
- Delete session: permanently remove the session, its transcript and report.
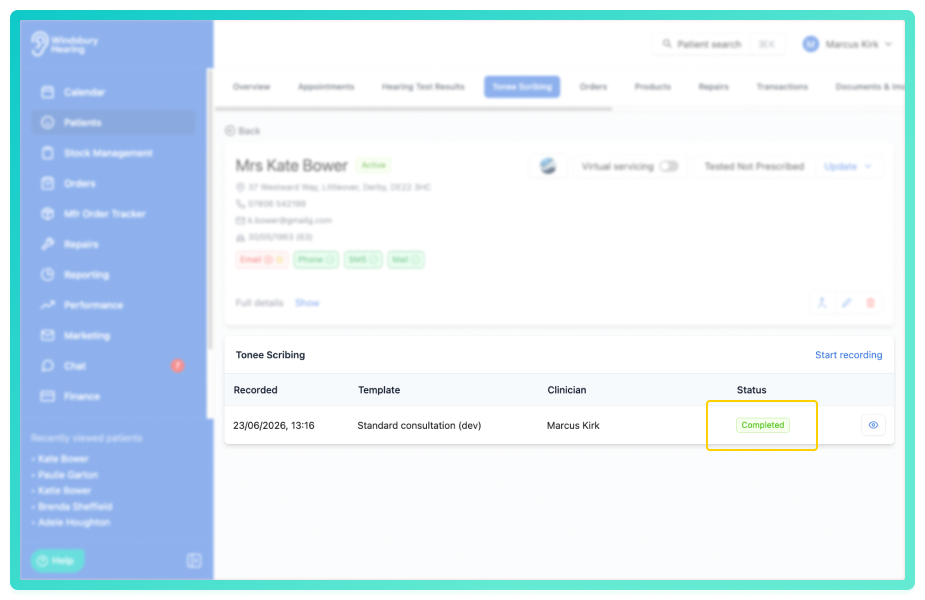
All recordings for a patient are listed in the session history on their Tonee Scribing card, showing when each was Recorded, the Template used, the Clinician and the Status. Click any entry to reopen it.
Reminder: the report is an AI-generated draft and contains patient-identifiable clinical information. Always review it for accuracy before relying on it, sharing it, or saving it to the record.Warning: deleting a session permanently removes the recording, its transcript and the generated report. This cannot be undone — make sure you've saved anything you need first.Was this article helpful?
That’s Great!
Thank you for your feedback
Sorry! We couldn't be helpful
Thank you for your feedback
Feedback sent
We appreciate your effort and will try to fix the article